Overview and benefits of reupholstering a Queen Anne chair
Why choose to reupholster a Queen Anne chair
In South Africa’s lounges, a single decision can redefine a space— to reupholster queen anne chair, you blend history with modern flair! A recent survey found 72% of homeowners would rather refresh fabric than buy new, proving the enduring appeal of quality seating.
Overview: modern upholsterers reinforce the wooden frame, replace worn springs, and hand-sew lush fabrics that honour the chair’s silhouette. The result is renewed comfort, improved posture, and a bolster of charm that fits both contemporary and classic interiors. Durable fabrics extend life and keep the chair’s graceful lines intact.
- Preserves craftsmanship and patina
- Custom fit and fabric selection tailored to your space
- Extends chair life while enhancing comfort and style
Key features of a Queen Anne chair to protect during reupholstery
South African lounges cradle a chair that marries heritage with a wink of irreverent style. A striking 72% of homeowners prefer refreshing fabric to buying new—proof of the enduring allure of quality seating. If you reupholster queen anne chair, you’re weaving longevity into a timeless silhouette.
Overview: Modern upholsterers reinforce the wooden frame, re-tension springs, and hand-sew plush fabrics that honour the chair’s graceful lines. It also opens the door to reupholster queen anne chair with fabrics you love while keeping the original charm intact. The result is renewed comfort, improved posture, and a bridge between classic charm and contemporary interiors.
To preserve the Queen Anne look, protect these features during reupholstery:
- Carved crest and finials
- Curved back rail and swooping arms
- Cabriole legs and delicate feet
- Sprung seat and webbing integrity
Durable fabrics extend life and keep the silhouette crisp, ensuring your space feels both nostalgic and new.
Budget considerations: cost vs replacement
In sunlit South African lounges, a Queen Anne chair can be reborn, its silhouette whispering heritage with a wink of modern flourish. A 72% figure reveals homeowners prefer fabric refresh over replacement, proof that real craftsmanship outlives trends and makes a lasting impression.
Overview and benefits: The option to reupholster queen anne chair offers renewed comfort, improved posture, and a seamless bridge between eras. Modern upholsterers reinforce the wooden frame, re-tension springs, and hand-sew plush fabrics that honour the chair’s graceful lines, while you select fabrics you love without surrendering the chair’s original charm.
Budget considerations: cost vs replacement — when weighing options, remember that materials and labor shape the final figure more than you might expect. Consider these budget factors when you reupholster queen anne chair:
- Materials and fabric quality
- Labor and turnaround time
- Frame inspection and hidden repairs
- Long-term value and resale potential
Estimated timelines for a DIY vs professional project
Across sunlit South African lounges, the decision to reimagine a beloved seat carries a quiet glamour. A fabric refresh can restore character without losing soul, and the idea to reupholster queen anne chair becomes a vow to heritage and craft. It blends era-spanning grace with modern ease.
Reupholstering renews comfort and posture, turning a sighing spine into supported ease for long conversations and lingering dinners. Modern upholsterers reinforce the wooden frame, re-tension springs, and hand-sew plush fabrics that honour the chair’s graceful lines while preserving its original charm. A living sculpture, indeed!
Estimated timelines:
- DIY: roughly 2–6 weekends, depending on pattern complexity and prep work.
- Professional: about 3–6 weeks from drop-off to finish.
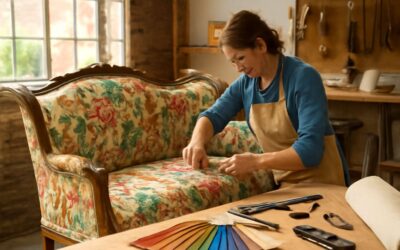
Choosing materials and fabric for traditional upholstery on a Queen Anne chair
Fabric types suitable for timeless Queen Anne styling
Tradition endures when fabric and wood tell one continuous story. In South Africa’s sunlit rooms, a carefully chosen fabric can outlast trends. Choosing materials for a reupholster queen anne chair isn’t just about color—it’s about durability, patina, and the conversation the cloth starts with the room.
Fabric types that align with timeless Queen Anne styling include:
- Velvet for opulent texture and warmth
- Damask for a timeless pattern with a subtle sheen
- Natural linen for breathability and crisp lines
- Wool blends for durability and resilience
- Performance synthetics for high-traffic spaces
Beyond aesthetics, consider weight, cleaning ease, UV resistance, and the padding beneath. I find that testing swatches near a sunny window reveals fade risk and how the fabric drapes over the chair’s curves. In South Africa, fabrics that tolerate humidity and maintain color fastness are especially valuable.
Matching fabric weight and pattern to the chair’s curves
“Fabric is the conversation between chair and room,” a South African designer often says. In sunlit lounges, choosing materials for reupholster queen anne chair isn’t about chasing trends—it’s about durability, patina, and a fabric that ages gracefully with the wood. When the Queen Anne curves are clothed in the right cloth, the room feels warmer and the chair weather-ready for humidity and SA sun.
Matching fabric weight and pattern to the chair’s curves is essential.
- Weight and drape that support the seat and arms
- Pattern scale that respects the silhouette
- Color fastness to sun and humidity
In South Africa, testing swatches near a sunny window reveals fade risk and how the cloth settles over the curves.
When a client asks how to reupholster queen anne chair with lasting elegance, the emphasis rests on aligning weight, pattern, and grain, letting the fabric settle into the curves with quiet confidence.
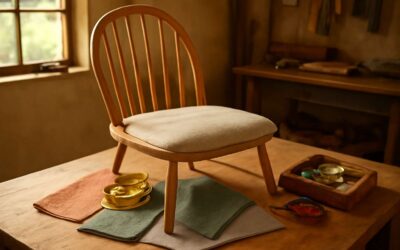
Padding and cushioning options for comfort and durability
In SA lounges, the fabric is the chair’s voice. A Cape Town upholsterer puts it plainly: “Fabric should outlast the moment.” When choosing materials for a traditional reupholster queen anne chair, durability and patina lead the way. Velvet for warmth, damask for heritage, and linen blends for everyday elegance all fit the silhouette. Consider weight, weave, and fade resistance, especially near sunlit windows where color shifts over time. The aim is fabric that ages with the wood, not against it. Indeed!
Padding and cushioning options for comfort and durability include:
- High-density foam with a dacron wrap for seat cushions
- Feather or down for a soft, luxe feel
- Traditional horsehair or a synthetic alternative for long-lasting support
Durability and maintenance: stain resistance and cleaning
In SA lounges, the fabric is the chair’s voice. A Cape Town upholsterer sums it up: “Fabric should outlast the moment.” If you intend to reupholster queen anne chair, the material you choose will age with the wood, not fight it.
Durability starts with weight and weave, and sunlight nearby windows can coax color to drift. Velvet adds warmth; damask preserves heritage; linen blends offer everyday elegance. The aim is fabric that ages with the wood’s glow, revealing character rather than shouting for attention. Choose fabrics that quietly endure!
- Velvet: warmth, depth, and respectful wear
- Damask: heritage with subtle lustre
- Linen blends: breathable practicality
Maintenance leans on stain resistance and simple cleaning, so fabrics with durable finishes stay pristine longer and keep the Queen Anne silhouette intact across seasons.
Color theory and coordinating with wood finish
Choosing materials for a traditional upholstery project on a Queen Anne chair is about storytelling, not trends. When you reupholster queen anne chair, the fabric should echo the wood’s character—neither shouty nor shy, but a companion that ages gracefully with the chair’s carved curves, as if the wood whispers back.
Color theory guides how textiles meet the wood finish. Lighter woods pair with creamy neutrals; dark woods invite richer tones.
- Warm neutrals paired with honeyed woods
- Deep jewel tones for mahogany and walnut
- Soft florals or abstracts that don’t overwhelm
- Texture over pattern to keep the silhouette crisp
Keep scale in mind: balance small prints with the chair’s curves, letting the silhouette remain the focal point.
Step-by-step reupholstery process for a Queen Anne chair
Disassembly: safely removing fabric and hardware
Every Queen Anne chair carries a quiet history, and a confident start to reupholster queen anne chair is disassembly done with care. Separating fabric, springs, and the frame protects the lineage while you prepare for a fresh look. This step-by-step sequence emphasizes safety and precise labeling—the small stuff that saves time later. In South Africa, this careful disassembly approach suits DIYers from Cape Town to Durban.
Disassembly: safely removing fabric and hardware is the first stage. Follow these steps:
- Remove old fabric: lift nails or staples with pliers, cut away fabric, save small pieces for patterning.
- Label and map components: mark back, seat, and hardware; keep screws in labeled bags.
- Detach springs or webbing if applicable: note placement; do not force joints.
With the fabric base removed, you’re ready to move on to padding, new fabric, and finishing touches—keeping the chair’s timeless silhouette intact.
Repairing joints and reinforcing the frame before reupholstering
The frame is the chair’s quiet spine; “Every joint tells a story,” a master woodworker once told me, and you feel its history in every grain as you prepare to reupholster queen anne chair. In South Africa’s sunlit workshops, joints whisper when looseness threatens the silhouette, and a craftsman’s patience becomes the true fabric of resilience.
- Assess wear at joints, confirm square alignment, and address any wobble so you can reupholster queen anne chair with confidence.
- Repair and reinforce: tighten compromised joints with discreet bracing, then test rigidity to ensure the frame remains faithful to the original silhouette of a Queen Anne chair.
- Prepare for fabric: ensure glue has cured and surfaces are true, so you can reupholster queen anne chair smoothly once padding returns.
With the frame stabilized, padding and fabric can be fitted to echo the chair’s timeless curvature, letting its Queen Anne grace endure.
Creating and applying new padding: foam, batting, and springs
From the heart of a South African workshop, stories rise with every curve. A seasoned hand whispers, ‘The seat remembers every step.’ The Queen Anne chair, with its slender legs and cherubic scrolls, asks to be listened to—not hurriedly fixed.
Creating and applying new padding: foam, batting, and springs for the moment you reupholster queen anne chair. The cushion’s soul is a balance of density and softness, layered to cradle the body while honoring the chair’s line. We select foam that resists compression, batting that cushions the wind of a sitter, and springs that restore bounce—then we invite the fabric to drape as if it were a second skin.
Then comes the artful finish: edges kiss the frame, fabric follows the chair’s timeless crown, and the silhouette remains faithful to the genesis of Queen Anne styling for those who reupholster queen anne chair.
Tucking, fitting, and securing the new fabric around curves
In our South African workshop, a Queen Anne chair isn’t merely furniture—it’s memory in wood and wool. When we reupholster queen anne chair, the first breath is a careful listening to curves, a dialogue between frame and fabric that sets the story in motion.
Step-by-step reupholstery process for tucking, fitting, and securing the new fabric around curves unfolds like a fairy-tale of craft.
- Tucking the fabric along the seat contours, the grain follows every gentle bend.
- Fitting edges to crown and rails ensures a smooth, faithful surface.
- Securing with discrete fastenings, the cover is allowed to breathe with the chair’s history.
The finishing touch honours the Queen Anne silhouette, letting memory linger in every seam and shadow.
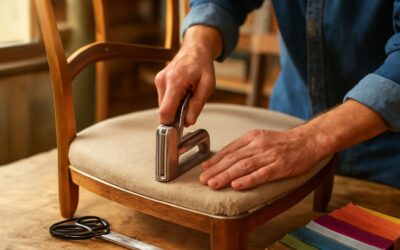
Finishing touches: trim, nails, and final inspection
“Quality is not an act, it is a habit,” my mentor used to say, and we wear that motto like a brass nail on every finish. In our South African workshop, a Queen Anne chair becomes memory in wood and wool—finishing touches are the last, essential breath. When you reupholster queen anne chair, the final details tell the story.
Here’s a lean, step-by-step finish to honor the curve-rich frame:
- Trim the fabric along the contours for a clean, even fall.
- Secure with decorative nails in a restrained pattern that echoes the chair’s lines.
- Inspect for symmetry, tension, and stitch alignment, adjusting as needed.
Those final touches ensure the chair breathes with its history, shadows and all, ready to grace a room with quiet authority.
Tools, techniques, and finishing touches for a professional result
Essential upholstery tools and supplies to have on hand
Every professional workshop knows that the right tools unlock you from fabric tangles and misaligned seams. When I set out to reupholster queen anne chair, my toolbox is my most trusted ally, shaping a finish that’s elegant and enduring!
- Staple gun and staples
- Upholstery scissors and curved snips
- Heavy-duty needle and strong thread
- Chalk or marking pencil
- Seam ripper or fabric spreader
I find techniques favor restraint over bravado: padding that breathes, fabric drawn with calm, and seams that glide along curves rather than fight them. A precise tack creates a quiet edge, while thoughtful finishing touches polish the overall silhouette.
Finish with a soft, disciplined eye: align grain with grain, ensure even tension, and tuck fabric neatly at corners. The result should feel effortless, like a chair that has always belonged in a refined South African living room.
Advanced techniques for tight curves and rolled edges
The curve of a Queen Anne chair is poetry in wood and fabric, and the right tools are the punctuation that lets it breathe. When I reupholster queen anne chair, I listen to the grain and honor the chair’s generous sweep. In a refined South African living room, restraint becomes luxury, and a well-timed tack speaks of craft.
Techniques for tight curves and rolled edges demand listening, not force. I favor careful easing, deliberate grain alignment, and calm tension to keep surfaces smooth, letting the fabric fall naturally along every contour.
Advanced techniques for tight curves and rolled edges grow from patient observation and tactile feedback; the finished line reads as a soft, continuous whisper of fabric along rails and crests.
Finishing touches are quiet acts of care—grain aligned, tension even, corners tucked—so the chair feels effortless, as if it has always belonged in a refined South African living room.
Protective finishes and fabric care tips to extend life
Tools shape the whisper of a well-executed reupholster queen anne chair. A collection of curved needles, a tack hammer, and sharp shears guide fabric along graceful rails, preserving the chair’s generous sweep. Quality tools invite steady, confident lines.
Techniques for tight curves and rolled edges hinge on restraint and alignment. Gentle easing, grain orientation, and balanced tension keep fabric smooth across crests and rails, turning every contour into a soft, continuous breath!
- Curved upholstery needle
- Tack hammer
- Sharp dressmaker scissors
- Fine upholstery staples
Finishing touches are quiet acts of care—corners tucked, trim aligned, fabric edges eased into place—so the chair looks effortless in a refined South African living room.
Protective finishes and fabric care tips extend life: a soft wood sealant and wax counter scuffs, while selecting performance fabrics and routine cleaning sustain colour and sheen for the reupholster queen anne chair.
Maintenance routines to keep the chair looking new
Tools shape the whisper of a well-executed reupholster queen anne chair. Curved upholstery needle, tack hammer, sharp dressmaker scissors, and fine upholstery staples guide fabric along graceful rails, preserving the chair’s generous sweep.
- Curved upholstery needle
- Tack hammer
- Sharp dressmaker scissors
- Fine upholstery staples
Tight curves and rolled edges demand restraint and alignment. Gentle easing, grain orientation, and balanced tension keep fabric smooth over crests and rails, turning every contour into a soft, continuous breath. I move with the chair, listening for the subtle give that signals harmony rather than force.
Finishing touches arrive as quiet acts of care—corners tucked and fabric edges eased into place—so a South African living room reads effortless elegance. Maintenance routines, including protective finishes and routine cleaning, extend life and keep colour and sheen resilient against the Cape sun and daily use.

0 Comments