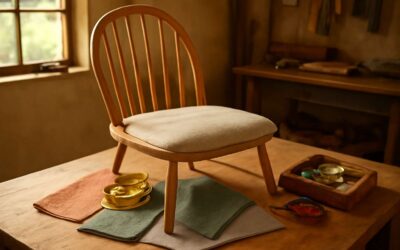
Tools and Materials Needed for Reupholstering a Stool
Essential Tools
Embarking on the journey of how to reupholster a stool requires more than just a keen eye; it demands the right set of tools and materials to bring your vision to life. The process is both an art and a craft, blending creativity with practicality. Having the proper equipment ensures that each step, from removing old fabric to stretching new material, is executed flawlessly.
Essential tools for reupholstering include a staple remover, upholstery scissors, and a foam cutter—each designed to make your task smoother and more precise. A staple gun is indispensable for securing new fabric, while a sewing needle or upholstery thread can help if any sewing repairs are needed. To keep everything organized, a set of pliers and a measuring tape are also highly recommended. Whether you’re working with a vintage stool or a modern piece, these tools transform a daunting project into a manageable craft.
- Staple gun
- Upholstery scissors
- Foam cutter
- Staple remover
- Measuring tape
- Needle and upholstery thread
Gathering quality materials like durable fabric, high-density foam, and sturdy batting will ensure your reupholstered stool stands the test of time and daily use. Mastering how to reupholster a stool hinges on having the right tools and materials at your fingertips—each one playing a pivotal role in turning a simple project into a piece of functional art.
Materials Required
Embarking on the journey of how to reupholster a stool is as much about selecting the right materials as it is about understanding the craft itself. The fabric you choose should speak to your personal style—think luxurious velvet or durable linen—each adding character to your piece. To achieve a truly polished finish, high-density foam is indispensable, providing comfort and shape retention over time. Sturdy batting further enhances the plushness, ensuring that your reupholstered stool exudes sophistication and resilience.
When gathering materials, consider quality as your guiding principle. A well-chosen fabric, combined with resilient foam and batting, transforms a simple project into a statement of craftsmanship. For precise measurements and seamless fitting, a reliable measuring tape is essential—trust me, accuracy here makes all the difference. To avoid any mishaps, keeping an organized workspace with all your materials neatly arranged will streamline the process and elevate your confidence.
Preparing the Stool for Reupholstering
Removing Existing Cover and Padding
Embarking on the journey of how to reupholster a stool is an act of reclaiming not just furniture, but a piece of personal history. Before diving into the creative process, it’s essential to prepare the stool thoroughly. This means carefully removing the existing cover and padding, which often hold stories of past use and wear. The old fabric can be stubborn, clinging to the frame as if resisting change, but patience and the right tools make the task manageable.
Start by flipping the stool upside down and inspecting how the fabric is attached. Using a staple remover or a flat-head screwdriver, gently pry away staples or tacks, taking care not to damage the wooden frame. As you peel away the fabric, pay close attention to how the padding is fastened. Sometimes, the padding is glued or clipped in place, requiring a bit of finesse to remove it cleanly. Removing the old padding reveals the underlying structure, giving you a clear canvas for your new upholstery.
To streamline the process of how to reupholster a stool, consider making an ordered list of steps:
- Remove old fabric with a staple remover.
- Peel away the padding, noting its placement and attachment method.
- Clean the frame thoroughly to prepare for new padding and fabric.
- Assess the condition of the frame to decide if repairs are necessary before covering it again.
Assessing and Repairing the Frame
Before you dive into the glamorous world of reupholstering, it’s critical to give the stool’s frame a thorough inspection. Think of it as giving your trusty old friend a wellness check—no point in dressing up a broken or wobbly frame. A sturdy foundation is the secret to a polished finish and long-lasting comfort. Once you’ve removed the old fabric and padding, take a moment to assess the integrity of the wooden or metal frame. Cracks, loose joints, or wobbliness are all signs it needs some tender loving repair.
If repairs are necessary, don’t shy away from a bit of DIY magic. Sand down splintered wood, tighten loose screws, or reinforce weak joints with suitable glue or brackets. Remember, a solid frame makes all the difference when learning how to reupholster a stool, turning a simple DIY project into a masterpiece of craftsmanship. After all, a beautiful new fabric deserves a reliable stage upon which to shine!
Measuring and Cutting New Materials
Measuring for Fabric and Padding
When reupholstering a stool, precise measuring and cutting are crucial. Accurate measurements ensure that your fabric and padding fit perfectly, giving your stool a professional finish. Start by measuring the seat’s length, width, and depth. Don’t forget to add an extra 2-3 cm around the edges for seam allowances and overlaps.
For padding, measure the existing foam or padding thickness to match or upgrade the comfort level. It’s often better to cut slightly larger pieces, then trim for a snug fit. Use a sharp utility knife or scissors to cut the fabric and padding cleanly.
A good rule of thumb is to use a pattern or old fabric as a template. If you’re working with multiple layers or different types of fabric, stacking and measuring each layer separately will save time later. Remember, the key to learning how to reupholster a stool successfully depends on meticulous measurement and careful cutting.
Cutting the Foam and Fabric
In the delicate dance of transforming a tired stool into a regal perch, the act of measuring and cutting new materials is where craftsmanship begins to breathe life into the project. Precision is paramount; a gentle miscalculation can unravel the harmony of your design. As you lay out the fabric and padding, think of each cut as a stroke in a masterpiece—careful, deliberate, intentional.
Start by marking the fabric and foam with a pencil or tailor’s chalk, ensuring to add an extra 2-3 cm around the edges for seam allowances and overlaps. For the foam, measure the existing padding’s thickness to match or even enhance comfort—sometimes a thicker cushion elevates both style and ergonomics. When cutting, use a sharp utility knife for foam and scissors for fabric, making clean, smooth strokes that glide through the layers without fraying or tearing.
To streamline the process, consider stacking the layers—fabric, batting, foam—and cutting them simultaneously, ensuring a precise fit that will sit snugly on your stool’s frame. Remember, meticulous measurement paired with careful cutting transforms the arduous task of how to reupholster a stool into an artful endeavor, setting the stage for a stunning, professional finish.
Attaching New Padding and Fabric
Installing Foam and Batting
Once you’ve prepared the frame and cut your fabric, the next step in how to reupholster a stool is installing the foam and batting. This part transforms the seat from firm to plush, inviting you to sit down and stay awhile. Begin by applying a generous layer of high-density foam, ensuring it fits snugly within the frame’s boundaries. The foam provides the necessary cushioning that elevates your stool from basic to beautiful.
To achieve that smooth, seamless surface, add a layer of batting over the foam. Batting acts as a soft buffer, softening any uneven edges and creating a luxurious feel. Carefully stretch and tuck the batting around the foam, securing it with a staple gun. For added durability and comfort, some upholsterers recommend removing excess batting and smoothing it out in a systematic way. This meticulous step ensures your finished stool exudes both elegance and resilience. If you’re wondering how to reupholster a stool that feels worn or flat, this combination of foam and batting is the secret ingredient to breathe new life into your furniture piece.
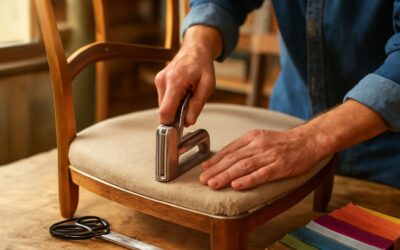
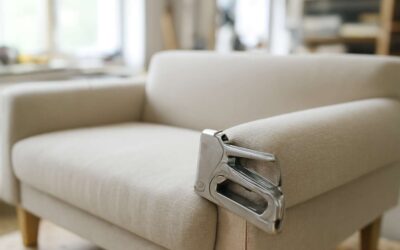
Stapling Fabric
Attaching new padding and fabric is where the transformation truly begins—your moment to breathe life back into a worn or dull stool. Once the foam and batting are securely in place, carefully position your chosen fabric over the seat. It’s a delicate dance of tension and precision, ensuring the fabric remains smooth and free of wrinkles. Using a staple gun, fasten the fabric securely around the edges, working from the center outward. This method helps distribute tension evenly, creating a flawless finish.
To achieve professional results, consider the order in which you staple. Start with one side, then move diagonally across to the opposite, gradually working around the perimeter. For those wondering how to reupholster a stool with a perfectly tailored appearance, patience during this step is paramount. The key is to keep the fabric taut but not overstretched, preserving that elegant, polished look. The final result should evoke a sense of timeless craftsmanship, where every staple secures your fabric like a delicate embrace—marking the culmination of your artistry in how to reupholster a stool.
Finishing Touches and Reassembly
Securing Edges and Corners
As the final curtain falls on your reupholstery journey, the art of finishing touches transforms a mere project into a masterpiece. Securing the edges and corners with meticulous precision ensures that the fabric drapes like a silk gown—smooth, taut, and resilient. It’s the moment when the fabric’s delicate dance with the frame becomes a symphony of stability and beauty.
Careful tensioning, combined with strategic stapling or tacking, locks everything in place, creating a seamless surface that whispers of craftsmanship. To achieve a truly polished look, I often find that gently tugging at the fabric while securing it prevents unsightly puckers or wrinkles from marring the surface. Remember, this is where patience becomes your greatest ally!
Once the fabric is firmly secured, reassembling the stool involves securing the reupholstered top back onto its frame, ensuring all screws and bolts are tightened with care. If you’re wondering how to reupholster a stool that will stand the test of time, these finishing touches can make all the difference. After all, it’s in these subtle details that the true beauty of your furniture is revealed—durable, elegant, and uniquely yours!
Reassembling the Stool
Reassembling your stool after the reupholstery process is where all the meticulous effort coalesces into a harmonious final piece. This phase demands patience and precision, as every screw and bolt must be tightened to restore the stability of your newly transformed furniture. Ensuring a secure fit not only preserves the integrity of your work but also enhances the overall aesthetic, allowing the fabric to sit perfectly flush against the frame.
To achieve a seamless look, I often recommend using a gentle hand to align the reupholstered top with the base, gently pressing and adjusting until everything feels just right. If your stool has multiple components, consider following a step-by-step order—such as fastening the seat first, then securing the legs—so the structure maintains its balance throughout reassembly.
Once reassembled, inspecting the finished piece for any loose fittings or uneven fabric is vital. Sometimes, a subtle tweak here and there can elevate the entire project from good to exceptional. Remember, knowing how to reupholster a stool is only part of the journey; carefully reassembling it with attention to detail is what ultimately reveals the true craftsmanship behind your work.
Tips for a Successful Reupholster Job
Choosing the Right Fabric
The choice of fabric transforms a simple stool into a statement piece, whispering stories of craftsmanship and character. When considering how to reupholster a stool, selecting the right fabric is paramount; it’s the canvas upon which your personal aesthetic unfolds. Opt for durable, high-quality textiles that can withstand daily life’s whispers and shouts alike—think of linen for a touch of elegance or tightly woven cotton for everyday resilience.
Intriguingly, the texture and weight of your fabric influence the final look and feel. Heavier fabrics tend to hold their shape better and add a luxurious heft, while lighter options can lend a breezy, casual charm. For a longevity that echoes the timeless spirit of the American Dream, consider fabrics that are stain-resistant and easy to clean.
As you explore your options, keep in mind how the fabric complements your space and lifestyle. The right choice will not only elevate your stool but also infuse your home with a renewed sense of grace and purpose.
Maintaining Your Reupholstered Stool
Reupholstering a stool isn’t just about slapping on new fabric; it’s an art form that demands patience, finesse, and an eye for detail. Once you’ve navigated the labyrinth of tools and materials, the real magic begins—maintaining your reupholstered stool is where the true craftsmanship shines. A well-maintained stool can last for years, becoming a cherished piece of your home’s tapestry.
To keep your newly reupholstered stool looking its best, regular cleaning and gentle inspections are key. Dust and dirt are the enemies of fabric longevity, so a quick vacuum or a soft brush every now and then is advisable. For spills or stains, a mild upholstery cleaner will do the trick—avoiding harsh chemicals preserves the integrity of your fabric and the investment you’ve made in your project.
In addition, consider periodic tightening of any staples or securing mechanisms, especially if your stool gets regular use. Little details like this can prevent sagging or loose fabric, ensuring your creation remains a masterpiece. Remember, knowing how to reupholster a stool is only the beginning—keeping it pristine elevates your handiwork to legendary status!
Troubleshooting Common Issues
Even the most meticulous reupholstery job can hit a snag—think of it as the comedic relief in your DIY saga. Troubleshooting common issues when learning how to reupholster a stool isn’t just about fixing mistakes; it’s about turning hiccups into triumphs. A frequent foe is loose fabric, which might seem harmless until your stool starts resembling a sagging hammock. The cause? Perhaps staples weren’t secured tightly enough or the fabric was stretched too thin.
To combat this, a quick inspection and a few extra staples can work wonders, ensuring the fabric stays snug and your masterpiece remains pristine. If you encounter uneven padding or lumps, don’t despair—simply adjust the foam or batting underneath, smoothing out imperfections. Remember, patience is key. Troubleshooting isn’t just about fixing errors; it’s about understanding the nuances of how to reupholster a stool and making your craft stand the test of time. Sometimes, a minor tweak is all it takes to elevate your reupholstering skills from average to extraordinary!

0 Comments