Signs Your Work Chair Needs a Fresh Cover
Visible Wear and Tear on the Seat Cushion
Three hours a day is the average. Most of us, however, sit for far longer, and our bodies pay the price. The silent witness to all that labour is the seat cushion, and it often breaks before we do. You notice the physical change first, a flattening that spreads outward like a slow leak. The once plump surface develops a sheen, not from polish, but from constant friction. The fabric might look intact from a distance, yet a hand pressed to the seat reveals a hard, unforgiving base instead of supportive give.
This is when the office chair reupholstery conversation becomes relevant. A compressed cushion no longer offers the support your lower spine needs. The foam has lost its memory. It has accepted the shape of your body and refused to give it back. The leather or fabric on the top may have wrinkled in a permanent way, a topographic map of your workdays. Even if the arms and base look fine, that sagging core compromises the entire seating geometry, forcing you to sit at an angle that strains your shoulders and neck.
A subtle sign is the arrival of stiffness when you stand up after a long stint. Your chair should cradle you, not fight against your movements. If you feel the wooden or plastic frame beneath the padding when you shift your weight, the internal structure is exposed. This is not a case for a simple cushion topper. The problem is deep. The seat also develops a groan or a crackle, small sounds of the material giving up. The journey of fixing this properly begins with understanding that the life of a cushion is finite, and that its renewal lies in professional hands. The shape is gone, and with it, the comfort.
Stubborn Stains and Lingering Odors
Stubborn stains are not cosmetic problems. They are evidence of a surface that has lost its protective integrity. Spilled coffee or ink that once sat on the fabric now sinks into the foam, carrying bacteria and acids deeper.
The same applies to lingering odors. A chair cannot be refreshed with a spray. The smell is trapped in the padding, and every workday reopens it. When these conditions appear, office chair reupholstery becomes the only durable remedy.
You can wipe the cover, but I have found the source remains below. A professional will remove the old layers and rebuild the seat, eliminating both the visual and the olfactory residue. The stale scent is the first signal, often ignored until the stain becomes permanent!
Frayed Seams and Splitting Vinyl
Run your hand along the armrest and you will feel it before you see it. The seam is rough, the thread beginning to part under years of daily pressure. Frayed seams are not an aesthetic nuisance. They signal that the fabric’s structural integrity has reached its limit.
Splitting vinyl tells a similar story. Once the protective top layer cracks, moisture and dirt find their way into the padding beneath that split. The damage widens with every shift in your seat.
Here is what I look for when inspecting my own work chair:
- Seams that catch on clothing during adjustment
- Vinyl cracks forming at the corners of the seat base
- Thread pulled loose along the backrest
Each sign points toward office chair reupholstery as the practical next step. The cover has stopped doing its job, and cleaning alone will not restore its strength.
Sagging Foam and Lost Lumbar Support
The seat gives way beneath you. The foam compresses slowly, each day stealing a little more of its resistance. Sagging foam is a quiet admission of age. The cushion no longer returns to its shape. Office chair reupholstery is the only way to correct what each workday has compressed.
Lumbar support follows the same path. The spine searches for a curve that no longer exists. You shift. You adjust. You cross and uncross your legs. None of it restores the absent pressure!
Here is what I notice in my own work chair:
- A sinking sensation when I settle into position
- Lower back pain by early afternoon
- The hard frame’s edge becoming visible beneath the cushion
These failures live beneath the surface. The cover may look intact. The foam beneath it has surrendered. Office chair reupholstery addresses what the eye cannot see. It replaces dead padding and restores posture.
Selecting the Right Upholstery Materials for Your Task Chair
Breathable Fabric Options for Long Workdays
Office chairs from retail stores often prioritise looks over airflow. If you have ever peeled yourself away from a sticky seat after a long video call, you know the struggle. Choosing breathable fabric is the heart of any smart office chair reupholstery project. Here is what I recommend:
- Open-weave mesh. This is the gold standard for ventilation. It keeps the back cool without sacrificing support.
- Breathable polyester. It gives you the smooth finish of leather but allows far more air circulation.
- Bamboo viscose blends. These offer moisture wicking and a subtle, natural texture.
I have refreshed several chairs for clients in Durban, where humidity makes this decision even more critical. The fabric you select sets the tone for every future workday. A cooler seat means fewer distractions and better focus. That alone is worth the reupholstery effort.
Leather and Faux Leather: Pros and Cons
There is a moment in every chair’s life when the surface decides its future. Leather carries a reputation for prestige, but it demands a certain temperament. Full grain leather develops a patina over years of use, a map of your working hours. It breathes better than vinyl yet remains unforgiving in a Durban summer. The office chair reupholstery process transforms a tired frame into something that feels permanent.
Faux leather, on the other hand, offers practical allure at a gentler cost. It resists cracking from humidity and cleans easily after coffee spills. However, it lacks the porous nature of genuine hide and can trap heat. Consider these points:
- Faux leather suits budget friendly refreshes with a consistent texture.
- Genuine leather requires conditioning to prevent drying in air conditioned rooms.
- Bonded leather splits after a few years, so inspect the backing.
Every material has a shelf life. The true craft lies in matching the surface to your environment, not merely the aesthetic. Choose wisely, and the chair becomes a silent partner in your daily grind.
Understanding Fabric Durability Ratings
Every fabric fails differently. The Wyzenbeek test spins cotton duck across the surface until threads break. That number, the double rub rating, tells you how long the weave survives regular pressure. Under 15,000 suits a guest chair. A task chair demands 30,000 or more. Martindale ratings matter too, especially for wool blends.
A common mistake in office chair reupholstery is choosing colour over construction. Consider the weave. Nylon and polyester resist pilling. Olefin handles moisture. Cotton frays fast and holds stains. Here is a benchmark:
- 30,000+ double rubs for full time use
- 15,000 to 30,000 for part time workspaces
- Under 15,000 for low traffic zones only
Match the grade to the hours the chair will carry. That is the real function of material. The right choice turns an office chair reupholstery into a durable investment.
Color and Texture Choices to Match Your Office
Roughly 5.2 hours each workday pass in a task chair. Office chair reupholstery lets you tune that surface to your office’s visual and tactile needs. Colour should reflect the room’s light and morale. Navy and graphite suit high-focus zones, while ochre and olive work for shared spaces.
Texture influences how a chair feels under sustained contact. A slick polyurethane feels efficient. A woven cotton blend provides durability but stays softer to the touch. Choose according to the room’s function:
- Open plan workstations: smooth, stain-resistant weaves
- Manager’s office: textured wool for acoustic comfort
- Reception area: easy-clean vinyl or polyester blends
This pairing of tone and weave makes the chair feel intentional, not incidental.
Fire Retardancy and Safety Standards
Most task chairs die by smouldering cigarette, not full blaze. Fire retardancy is a legal prerequisite, not a fabric afterthought, for office chair reupholstery in South Africa. SABS standards are strict. A luxurious fabric failing the cigarette test will not pass inspection.
When selecting materials, I always check the flammability rating on the label. Wool and modified acrylics perform well. Polyurethane foams require a fire barrier. The following options meet common commercial specifications:
- Virgin wool blends with inherent flame resistance
- Polyester fibres treated with flame retardant finishes
- Leather, which chars rather than ignites
Each material interacts differently with the fire retardant layer. A dense weave slows flame spread. An open weave accelerates it. Consult the upholsterer about foam density and barrier fabric. Your office chair reupholstery project must prioritise safety above aesthetics, because a pretty chair that burns is a liability.
How to Reupholster a Desk Chair from Start to Finish
Gathering the Essential Tools and Replacement Materials
Users seldom think about how many kilograms their chair supports each day. A South African office chair endures up to 500,000 load cycles before upholstery fails. I have seen chairs that lasted twice that, but only when the owner paid attention to the materials. Office chair reupholstery begins with gathering the essentials, not with fabric selection.
Start with the upholstery fabric, measuring the seat and backrest to account for seams. Add a heat-activated adhesive spray and high-density foam if the original cushion has collapsed. The tool list is short but specific:
- A staple gun with 8 mm staples
- A flat pry bar for removing the old cover
- Heavy-duty shears
- A rubber mallet
Once these materials sit on your workbench, the original cover serves as your pattern, and the tears in it reveal exactly where the new seams must align.
Creating Patterns from the Existing Upholstery
Most office chairs reveal their construction secrets only when you stop treating them as furniture. I have seen covers that looked beyond repair deliver flawless patterns. The old upholstery, once removed with care, becomes a cartographic map of every seam and dart. Learning how to reupholster a desk chair from start to finish begins with this dissection.
South African humidity distorts vinyl and fabric unevenly, so measure twice before cutting. The original cover provides the pattern, but not without scrutiny. Stretched edges and frayed stitching mislead. Mark the grain direction with tailor’s chalk. Transfer every notch and seam allowance onto fresh paper. This is where office chair reupholstery succeeds or fails on patience alone.
For complex shapes, trace the cover in sections. The seat base, the backrest shell, the waterfall front edge. Each piece needs its own grain orientation because errors multiply at assembly.
Cutting and Sewing the New Fabric Panels
Cutting fresh panels demands a steady hand and a sharp rotary cutter. Lay the traced patterns on the wrong side of the fabric. Align the grain lines with the original marks. South African sunlight fades synthetic fibres quickly, so maintain consistent orientation across every section.
The seat base and backrest shell need separate handling. Sew the waterfall front edge last. This prevents tension wrinkles from forming at the curves. A walking-foot machine handles thick upholstery fabric without shifting the layers. Use polyester thread for its UV resistance.
Pin the panels together before the first pass. Test the fit on the chair frame while the fabric is still loose. Adjust seam allowances at the corners, not the middle. For office chair reupholstery, a clean cut removes the need for repeated re-stitching.
Attaching the Fabric and Rebuilding the Chair
The true test of office chair reupholstery begins when the needle falls silent. Any artisan can sew a straight seam, but the spectral art of rebuilding demands a more deliberate hand. The fabric is merely a shroud; the frame is the skeleton that gives it form.
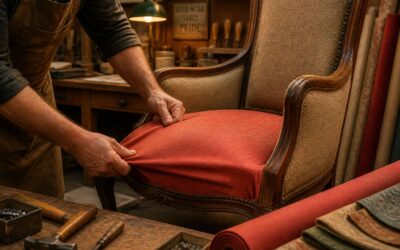
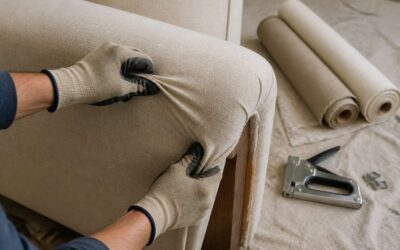
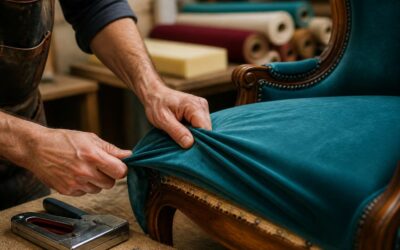
Begin with the seat base. Position the freshly sewn panel over the foam and pull the fabric taut from the centre outward. A single misaligned corner will create a cascade of ripples across the entire surface. Work slowly. The first staple is the anchor, and it must be perfect.
To secure the upholstery properly, follow these steps:
1. Staple the front edge, then the back edge, leaving the sides loose.
2. Pull each side downward with even tension before securing.
3. Fold the corners into clean, sharp pleats and staple them flat.
Once the base is dressed, reattach the backrest shell with the original screws. Do not overtighten, as stripped threads in the plastic housing are a silent death sentence for the chair. A quick inspection of the gas lift and tilt mechanism before final assembly will save you from a second disassembly later.
The final result is a chair that carries the vestige of its former life, reborn from the dust of old foam and frayed threads. This is the quiet triumph of office chair reupholstery.
Testing Comfort and Adjusting the Fit
Once the frame is reassembled, the true measure of your office chair reupholstery arrives when you sit. The first press of your weight against the new fabric tells you everything. Too tight and the padding feels unyielding. Too loose and you will feel the frame beneath the foam before the day ends.
Adjust the tension by loosening the front staples, then pulling the fabric again from the centre. Small movements produce large shifts in comfort. Check the seat height against your desk. The gas lift may need a fresh turn if the chair sits lower than before.
- Sit for five minutes before finalising the job.
- Shift your weight from side to side to test the edges.
- Confirm the backrest angle matches your lumbar curve.
The office chair reupholstery only proves itself in these quiet moments of adjustment, when the chair finally matches the way you actually move.
DIY Project or Professional Service: Making the Right Call
Evaluating Your Skill Level and Workspace
Reupholstering a chair requires patience and precision. Before you commit to the DIY route, examine your environment. A cramped flat with a wobbly desk will sabotage quality work. In South Africa, many homes lack a dedicated workshop, so an honest assessment of your space is critical.
DIY office chair reupholstery spans multiple sessions, not one afternoon. Fabric cutting, foam shaping, and stapling demand deep focus. If you cannot leave your materials set up between attempts, you will rush and create costly errors. Professional services bring industrial tools and a controlled atmosphere.
Assess your readiness with these questions:
1. Have I successfully repaired furniture before?
2. Can I handle repetitive, tedious tasks without frustration?
3. Is my workspace bright and free from dust?
4. Do I have room to store the chair for a week?
Your answers reveal whether hiring a professional makes sense. A clean area and a steady mindset make DIY feasible. If doubt lingers, outsource the job and keep your sanity intact.
Cost Comparison: Supplies Versus Hiring an Expert
The allure of a modest supply bill is powerful, but the true cost of DIY office chair reupholstery often loses a battle against the clock. A specialist’s quote includes their expedience, a commodity you cannot purchase at a fabric shop. My own first attempt on a secondhand chair took three weekends; the material alone was a fraction of the professional price, yet the hours spent were considerable.
Before committing your wallet, consider these outriders that often inflate the DIY budget:
1. The cost of a heavy-duty stapler and quality pneumatic staples.
2. Replacement webbing or clips discovered after you tackle the seat base.
3. The price of correct foam adhesive, beyond just fabric.
4. Potential fabric waste from wrong initial cuts.
A professional snips corners with a practiced confidence that shortens the timeline significantly. They absorb the cost of industrial tools and the risk of hidden damage. When your motivation stems from saving money rather than enjoying the assembly, handing over the chair often proves the more prudent financial decision. The value of your weekend, spent working rather than wrestling with a plywood frame, frequently outweighs the premium invoiced for professional service.
Time Commitment and Common Pitfalls
The seductive promise of a home workshop project hits a brick wall when you realise the clock is the real currency. My own experience with office chair reupholstery taught me that patience is not a virtue, it is a prerequisite. A professional completes the job while you are still deciphering the mysteries of the pneumatic staple gun.
Time commitments spiral when you discover hidden obstacles. Here are the usual suspects:
1. The seat base reveals a cracked plywood frame requiring surgery.
2. The foam crumbles into dust upon contact with the new fabric.
3. The existing clips are corroded and refuse to cooperate with fresh webbing.
Each discovery adds an hour, then a day, then a decade to your timeline. A professional sees these pitfalls immediately because they have encountered every variation of chair damage. They do not learn on your furniture. The choice becomes simple. Do you have weekends to sacrifice, or do you prefer to spend them not wrestling with foam adhesive and steel staples? The expert route offers the latter, and your sanity remains intact.
Caring for Your Newly Upholstered Chair
Routine Cleaning and Spot Treatment
A newly upholstered chair deserves more than admiration; it deserves a ritual. After office chair reupholstery, the fabric’s longevity depends on how you tend to it during the first weeks. Routine cleaning begins with a weekly dry brush to remove dust from the weave. Vacuum with a soft brush attachment every fortnight. For spot treatment, blot spills immediately with a clean cloth rather than rubbing them in. Mix a few drops of mild detergent with water for stubborn marks!
The climate in South Africa, with its dry winters and humid summers, affects fabric fibres differently. In humid months, check for mildew along the seams. In dry months, use a humidifier to prevent the fabric from becoming brittle. A simple system preserves the fabric:
- Keep the chair away from direct sunlight to prevent fading.
- Rotate the chair’s position occasionally to balance wear.
- Use a fabric protector spray designed for the specific textile.
These small acts preserve the work you invested in your office chair reupholstery.
Protecting Against Sunlight and Abrasion
South African sunlight is relentless. The UV index here can be brutal, and it is the single most aggressive enemy of your fresh fabric. That vibrant blue or deep charcoal you chose for your office chair reupholstery will fade to a washed-out shadow if the chair sits in a direct beam for hours each day. The molecular bonds in the dyes break down under intense radiation, and once that happens, there is no reversing the damage.
The second threat is physical abrasion. This is not just about the friction from your clothing as you shift in your seat. It is the constant scraping against desk edges, the brush of a passing trolley, and the rough contact with metal chair bases. Every office has these hazards hidden in plain sight, and they slowly pill the fabric surface or create shiny, worn patches on leather.
To defend your investment, consider the placement of the chair relative to windows and high-traffic pathways. If you cannot move the chair, install a sheer blind to diffuse the harshest midday rays.
- Apply a UV-protective film to the window glass to block 99% of harmful radiation.
- Use protective floor mats that also create a buffer zone around the chair’s casters, preventing debris from being kicked up onto the lower fabric panels.
- Check the armrests for sharp plastic edges that might catch on the seat side panels during daily use.
A simple repositioning of your desk by just a few degrees can create a shadow that shields the upholstery for most of the workday. This proactive approach ensures that the crisp lines and rich colour of your office chair reupholstery remain intact for years, not just for the first season.
Maintaining Chair Mechanics During Upholstery Work
The silent skeleton of your chair, the mechanics that allow for synchronous tilt and smooth height adjustment, rarely receives a thought until it seizes. I have seen office chair reupholstery projects fail not because of a poor fabric choice, but because the pneumatic cylinder or the star base was ignored during the overhaul. The upholstery work is often the perfect moment to inspect the load bearing components that are usually hidden beneath the seat pan and protective covers.
When you strip the chair down to its frame, you gain unobstructed access to the gas lift mechanism and the tilt tension knob. This accessibility is a rare opportunity. Wipe away the years of accumulated dust and lubricate the moving joints with a silicone based product. Check the caster wheels for hair and tangled fibres that restrict their rotation. While the fabric is off, you can verify that all the bolts and screws are torqued correctly, preventing a wobbly seat that undermines the new upholstery.
The fabric you have so carefully selected will only perform well if the chair’s posture remains sound. A faulty lock mechanism or a broken lever undermines the comfort of fresh foam. In my experience, addressing these mechanical issues while the chair is already dismantled saves a significant amount of future frustration. It is a pragmatic approach that merges aesthetic renewal with structural integrity. By attending to the metal and plastic parts, you extend the life of your office chair reupholstery investment far beyond the visual surface.
– Inspect the swivel mechanism for any grinding resistance during rotation.
– Replace any nylon bushings that show signs of wear or cracking.
– Clean the metal rails and tracks with a dry cloth before applying a fresh layer of grease.
When to Plan Your Next Upholstery Refresh
Once your chair has been returned to its former glory, the clock on its next transformation begins ticking quietly. Fresh fabric invites a certain discipline. A damp cloth and gentle vacuuming will keep the fibres respectable, but the real care lies in how you sit, shift, and settle. Your posture influences wear patterns more than you might imagine.
Most people wonder when to revisit office chair reupholstery. The honest answer is before you notice damage. If the cushion loses its resilience or the seat begins to feel less supportive, that is your cue. Waiting until the fabric splits forces a rushed decision. Planning eighteen months ahead allows you to choose materials deliberately and budget without panic. The lifespan of quality office chair reupholstery depends entirely on this forward thinking.

0 Comments